Sunday, 9 August 2015

Week 18 before launch - Production and fitting of the Sheerplank


 03.08.-09.08.15

Producing and fitting of the Sheerplank 


was this week's task. Or let's put it different, the hull was supposed to be completed at the end of this week!


Ant working on the really long sheerplank


The sheerplank I want to leave bright finished. Therefore I ordered a special kind of plywood from Germany. The deck-veneers of this plywood sheets are of quartercut Sapeli. So the surface shows nice grainlines over the whole length of the boat.


In the meanwhile the process of getting the lines, cutting and scarfing as well as fitting the glued plankpieces to the hull has become routine and so the weekly target was reached.

both Sheerplanks are ready to be fitted


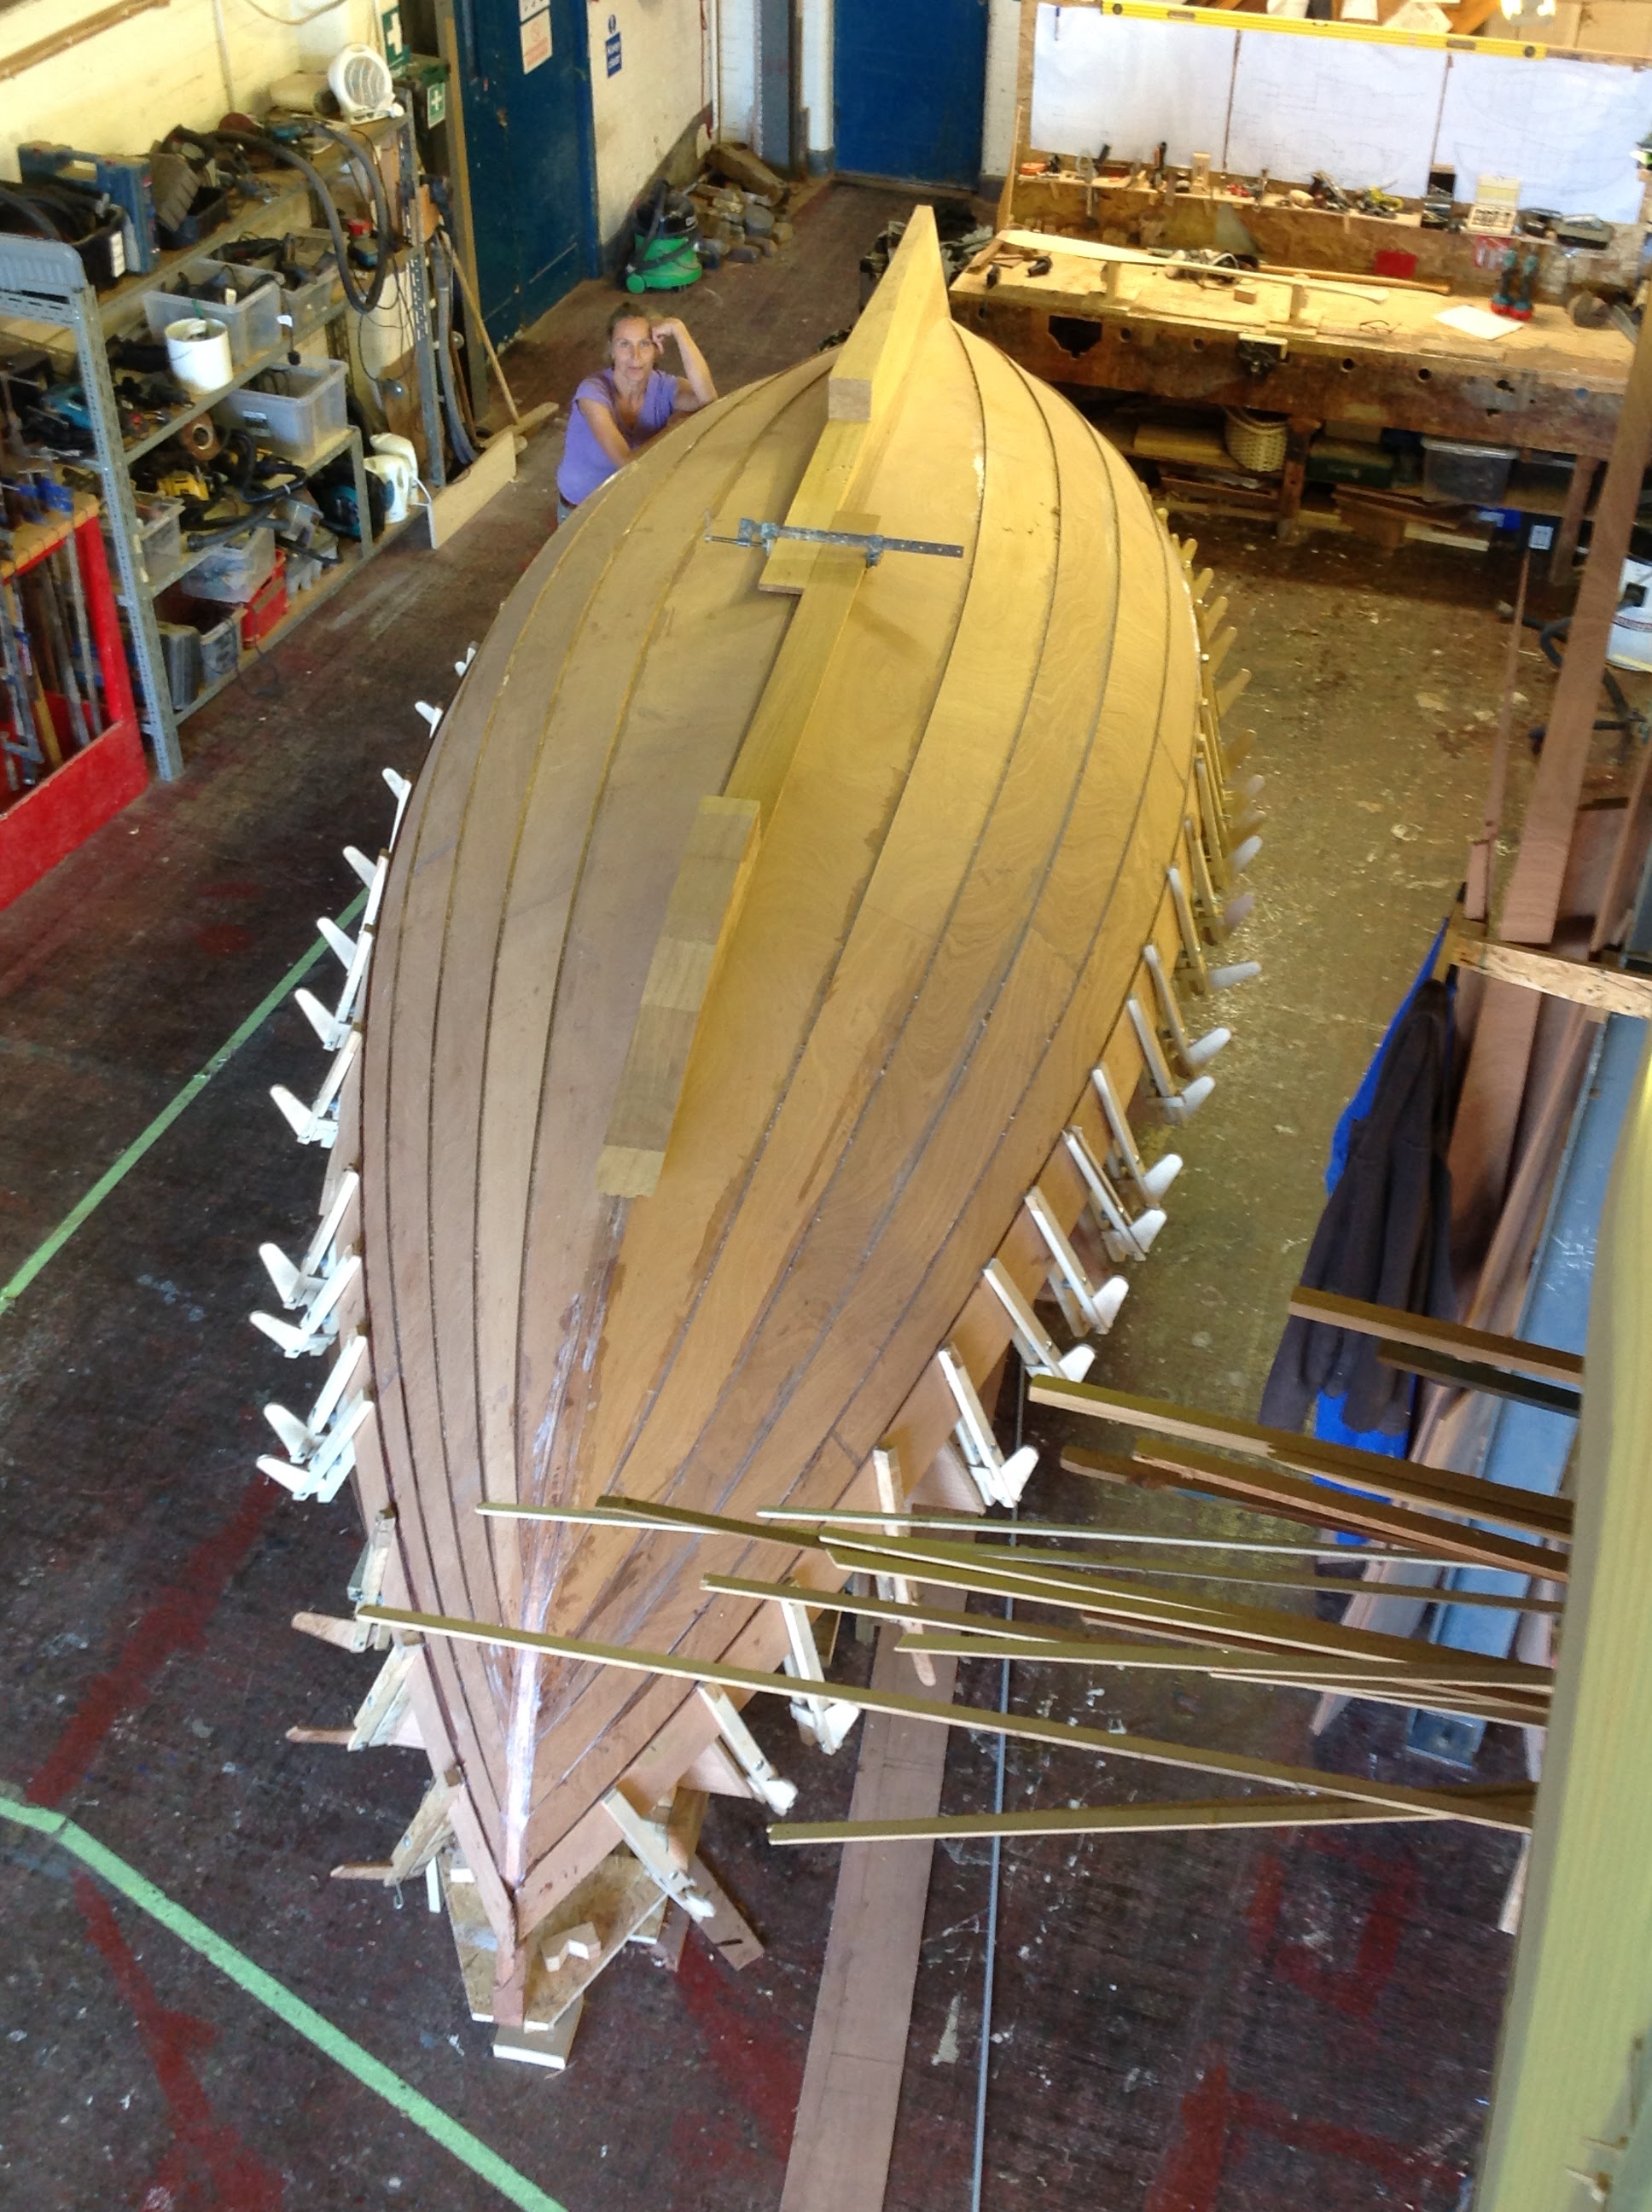
On Friday I happily posed with Eva in front of a finished new doubleender-hull.


Isn't she pretty?

Sunday, 2 August 2015

Week 19 before launch - Oar- and sparmaking & the 6th planks on "My Way"


27.07.-02.08.15

Oar- and sparmaking-week & the 6th planks on "My Way"

 This week there was the oar- and smarmaking on the school-schedule. 
 
As I decided to need no oar for "MyWay" I made one for my collegue Ant. I finished on Wednesday and decided to use the time left to produce a nice paddle for myself. 

Ant's oar is getting shape


I started to shape the paddle, but ran out of time and couldn't finish it. The finished one will be shown later.  Here a view pictures from the beginning.

First I glued a piece of mahogany as stringer between to parts of spruce.


Then I drew the shape on the raw piece of wood and cut it out.

..... will be continued...


In the evening hours I continued working on "MyWay". To get back to schedule I worked very late every day and the result was that plank number 6 on both sides was glued on friday evening at 10 pm!


                                                                                              My ladies....


Sunday, 26 July 2015

Week 20 before launch - Producing the 4th and 5th planks


20.07.-26.07.15

Producing the 4th and 5th planks


As we decided to get the opportunity to work on every boat Ant and Mark joined me this week and Ross changed to Stevens 12 1/2 Hereshoff.

We started the week making the templates for planks Nr. 4 & Nr. 5 and cutting the pieces plywood we would need. The procedure was the same as described before and Tuesday morning we had the glued planks ready to be shaped. But....

Ant and Mark working with my dustpreventing
multifunctional  routerhousjig ver.1.2.5


I had the idea, to glue the scarfs with epoxy without added Silica to get bright finished nice gluelines. Good idea but bad mistake. While shaping the planks Ant realized some large gaps inside the scarfs and we found them glued together very badly. After some discussions the decision was felt ....


The rescarfed and repaired plank no 4 already glued
 "Cutting the scarfs, clean up and plane them new"

                                                                                                                                                                To loose not too much time we glued the planks and scarfs already on the hull and so on Tuesday evenening the planks were placed  and we could start plank No 5....


...which was sucessful finished on Thursday evening.


After trying different techniques we came back to good old handwork and started scarfing the planks manually again. Only one thing we changed. We piled all 3 plankpieces and scarfed them all in one. A sweaty but also very fast and accurate method.  


Sunday, 19 July 2015

Week 21 before launch - Planing down the garboard, producing the 3rd planks, producing the keel


13.07.-19.07.15

Planing down the garboard, producing the two 3rd planks, producing the keel


This week I started with great ambitions. On Sunday I made a scarfing jig for the router hoping as to be faster in producing the single planks. Parallel to the planking was the further work on the keel part of the program. Soon I realized that my (well working) jig was to small for my following planks cause of the always varying scarf angles.

Planing down the left overlap of the garboard and plank
The first two days of the week Mike (one of our intructors) helped me to plane down the garboard overlap on the hog, to get a smooth and flat surface for the Iroco-keel to be fitted on later.


Ross while working on the skeg
Ross shaped the keel to the rabbet-line. It was a hard piece of work, cause the 130mm width and more than 2000mm long piece of laminated wood needed very intensive chisel- and planework. At the end of the week  (Friday) Ross told me tired but very proud to have finished his work.


The positioned skeg

I wasn´t as successful. The already last week started production of the 3rd plank was finished Monday evening. Happily I put it on the hull...... jet it didn`t fit...... I tried again and again..... but had to realize: the shape was wrong, the lines didn´t match the marked hull points. I was definitely frustrated.


Plank No3 waiting to be shaped
Tuesday I started to produce a new template. The same procedure from the beginning but with my new and now larger router jig ver2.1.3. I finally got both planks number 3 ready.


Sunday evening the planks were glued and also the aft keel-part was nearly finished after I had shaped it with the power planer.
At least it was a successful week although I hadn´t reached my target, which would have been plank Nr. 5 at the end of the week. 


Next week ....

Sunday, 12 July 2015

Week 22 before launch - Producing 2nd garboard/2nd planks & starting the keel-production


06.07.-12.07.15 

Producing the second garboard + 2nd planks & starting the keel-production


On Monday I wanted to fit the garboards, but Ross needed me to prepare the Iroko-pieces for the keel. Pete started to scarf the 2nd garboard-pieces.

In the evening again Eva helped me to glue the garboard.

On Tuesday I again wanted to finish the garboards but I managed only to fit the first one. At least we managed to do that. The two next (2nd planks) were projected to be scarfed and glued. But only one was. It ooks as if a lot of weekend hours will be needed in the future.

On Wednesday things began to flow. We started to produce the template for the 2nd planks and in the evening I happily could say "Hey, the two garboards are glued onto the hog and one plank is already waiting to be cut and shaped"

Marking the bevel nedeed for the landing


To fit the planks perfectly onto the moulds it was necessary to flatten the moulds for the planks. The second point was to bevel the garboard to allow the following planks to sit on a bed (the landing or overlap). To get the right bevel I used a fidd as shown on the picture. The overlap is twice the plank thickness as is the gap on the fidd.


The two planks, one already finished, the second waiting to be copied with the router.


To get the correct shape it is necessary to produce EXTREME  accurate templates as I realized a few days later. Never try to hurry!


Here you can see the two planks fitted and waiting to be glued.


Sunday, 5 July 2015

Week 23 before launch - Inner stems, hog & 1st garboard


29.06.-05.07.15

Inner Stems, hog & producing the first garboard plank


Adapting the hog to the stems
The backbone consists of  the two inner stems and the hog. The hog is the base where the garboards (the first and lowest planks) will be glued onto. 

To get a smooth curve from the hog to the stems to be connected I drew on the hog the extended line of the stems and  carved a lot of small grooves to make it easier to chisel it down.


The result - stem & fitted hog


Sometimes you have to do something which does not really need to be done. For example putting the outer stem onto the inner stem - just to see how it will look. In the gap between the outer stem and innerstem/hog the keel will later be fitted.


aft stems


bow stems


Leveling the hog to the moulds
The next step was to bevel the hog over the whole length to the level of the moulds.

The line from the hog to moulds has to be smooth so the garboard can adapt perfectly to them. This process has to be done very carefully because the sailing performance of a boat depends on a large percentage on the lining of these planks.


After leveling the hog to the moulds we had to do the same with the stems. The planks have to fit to the stems at a certain angle, which changes constantly over the whole length of the stem.

As a preparation therefore, we did "revolved sections" of the stems during the lofting. That means we constructed the angle of the incoming planks to the stems. That enabled us to plane the now required bevel on the stems.


On Thursday we started to line up the planks. (that means we divided the "boat hull" into 14 parts (7 each side) to find the best shape for the planks. To get nice and fair lines, we used long wooden battens. We came to a solution, which was a compromise between our results and the proposal of the designer Iain Ougthred.  This process of trial & error took a whole day.


By Friday evening I was behind my projectplan, the garboard pieces were cut, but far from being fitted as projected ;-) - so a couple of extra hours at the weekend were needed.

Friday evening  Eva assisted me in glueing the first garboard plank. Saturday I cleaned it and Sunday I started to fit it to the backbone.


Sunday, 28 June 2015

Week 24 before launch - Erecting the moulds & laminating the stems


On March 6th 2015 I started the 38 Boatbuilding-Course at the BBA in Lyme Regis. The first 14 weeks we learned about working with wood, including different kinds of joints. Also working with GRP and last but not least we lofted the boats to be built. The process of lofting is to draw the lines of the boat on large sheets in scale 1:1 to get the true shape of the boat. 


On June 22nd we started the real "Boat-Building". My partners at the beginning were Pete & Ross.

Erecting the moulds & laminating the stems


Ant and me - lofting and working with Auto-CAD
As it's a big boat to finish in such a short time I tried to do some preperations the weeks before as an evening"meditation" after the woodworking course. I laminated the deck-beams and since my planning-partner Ant is familiar with Auto-CAD, we decided to do a table of offsets from our lofting and get the moulds cut by CNC.


Still happy with my moulds

As it turned out, something went wrong with the cutting and we had to correct 8 of the 9 moulds.
The first practical work was building the ladder-frame, the base on which the moulds will be erected. It's name derives from it's shape reminding me of a ladder. While Pete & I worked on the frame Ross made templates of the moulds on tracing paper to correct them.

It took us two days to correct the moulds and to erect them. Erecting the moulds we did by drawing a centerline on the frame, which was the base to line up the stations (moulds) exactly. To get the moulds leveled & perpenticular we used a plumb and spirit level and finally we got a laser which made this work much easier. To know both methods is always useful.
Wednesday evening - the moulds are not yet lined up correctly, but you can already imagine the size of the boat

Beside the setup of the moulds Ross & Pete prepared the lamination station with the irons to produce inner & outer stems (fore & aft). I decided to make the stems out of Sapele, due to its good durability. For the lamination process a template of the part to be laminated has to be made and according to this shape the irons are bolted on an OSB-board  - covered with plastic or tape to avoid that the laminated wood sticks on this surface. The glueing itself has to be quickly done because the pot-time of the epoxy we used is approx. 30 min. So you need some guys to help put the glue as fast as possible onto the timber-strips, a lot of clamps and small taped wooden blocks well positioned in advance, to get the job done as fast as possible.


Laminating the bow outer stem


The laminated wood has to cure approx. 10 hours. To get the stems ready for fitting on the moulds, you have to clean them (that means warming it up with a heating gun to scrape down the excess of epoxy) and plane them to the needed thickness.

At the end of the week all four stems were done!

Thursday the hog was crafted from three Iroko-boards, each of them scarfed to get the length we need for our 21,6 ft boat. To get the shape of the hog, we laminated the boards directly onto the moulds.


Lamination of the hog on moulds


Friday we cleaned the hog and started to fit inner fore- and aftstem to the hog.

Cleaning the hog

fitting inner aft stem to hog