Sunday 27 September 2015

Week 11 before launch - Working on the yard, boom, mast and rubrail & top-coating the hull


21.09.-27.09.15

Working on the yard, boom, mast and rubrail & top-coating the hull


The 4th primer-coat I drysanded with 320 grit continuing with wetsanding 320 and afterwards 400 grit. That result was o.k. then. At Tuesday we started to put on the first of 4 coats of Epifanes Double-Pack Top Coat.  One person rolls on the colour, the other one puts off what seems to be to much with a ........

As usually we painted late at night, night after night and always a bit later as the drying time was 24 hours and between each layer of top-coat the paint had to be wetsanded with a 600 grit abrasive and carfully cleaned after to get the surface as dust-free as possible. 


While the painting was evening-/night-shift during the day we worked on the yard, boom, mast and the rub rail.

While I finished the yard, Ant & Ross did the scarfs of the mast and glued them. After that Ross started to shape the boom and finished it until the end of the week. 

Ross, shaping the boom


Pete did all the work concerning the rub-rail: scarfing, glueing and fitting it to the sheer-plank. The rubrails will be part of the sheerplanks and will be fitted to their bottom edge, were they meet the white top-coat of the hull.

The two 7.50 m long rubrails 

Pete´s scarfs are nearly unvisible! Well done!


The two masthalfes with one straight and one tapered side

On Thursday I started to shape the two masthalfes. I got the advice to add 10 inches to the mastlength to be able to hoist the sails properly. The mast will have an asymmetric shape. The bowside will be tapered and the aftside straight.
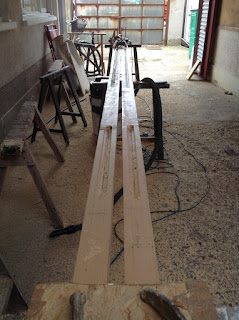


The partly hollowed mastpieces


To reduce the mastweight, I hollowed the  2 masthalfes with a router according the rule 20:60:20 which means 20% of the diameter should be left to get full stability. The first 500 mm I left solid to mount my fittings later.


Sunday 20 September 2015

Week 12 before launch - Producing the yard & finishing the rudderblade+centerboard & coating the hull with primer


14.09.-20.09.15

Producing the yard & finishing the rudderblade+centerboard & coating the hull with primer

 
This week we intended to produce the yard, finish the rudderblade and centerboard and coat the hull with primer.

The yard will be the gaff boom for the rigg and is shaped out of Alaskian Spruce. To get the squared and out of 4 pieces glued boom round it needs a lot of plane work and a special spar gauge.


Starting shaping the yard


The gauge seen below has a width of  24 parts (mm, 16ths, eights or whatever) which are departed in a ratio of 7:10:7. You use it with two pencils as shown on the picture and it enables you to mark the lines you need to take off the right amount of wood.


Using the spar gauge


 The nearly finished spar with a lot of nice shaves.


While I was working on my yard, Ant continued with the rudderblade and centerboard which he sheathed with two layers of plain weave 200.

The glassed centerboard


Sheathing the ruderblade


fitting the ruddercheeks


The rudderblade is really huge. The total lenght is about 1700 mm


The eveningtime Eva and I spent in romantic primerpainting sessions. The primer is a double pack product and is needed to seal the boat and get a smoothe base for the top coat.


painting the primer


We put on 3 coats of primer. Between the coatings we had to wait at least 8 hours. So our days were timed by the drying times of the paint and evening work was a usual thing during this week.

I´m a bit upset, that I didn´t take more fotos of this and the next week, but the night hours as well as the never ending sanding drained away all my energy.


 As mentioned we first put three layers of primer on, but the result was far from perfect. It was as I would call it a terrible "orange skin" and who want's his new baby to have "orange skin". At first I imagined it would smoothen by wetsanding, the normal procedure following the painting. I Started with wetpaper 240 grit. But as that seemed to have no effect at all I went back to 180 grit. At the end of the day I was more than frustrated:  Still "orange skin" but a lot of spots without any primer any more. 

After having spent about 20 hours sanding with no convincing effect, I was so annoyed, that I decided to sand with dry abrasive 180 grit and to put on a 4th coat of primer on saturday - not before contacting Hempel, the producer, what they would suggest to prevent the uneven surface.

Sunday 13 September 2015

Week 13 before launch - Production of rudderblade/centerboard & Painting the coppershield


 07.09.-13.09.15

 Production of rudderblade/centerboard & Painting the coppershield


Ant starts crafting the rudderblade

While Ant started crafting the rudderblade and the centerboard I prepared the hull to get ready for painting.

We made the rudderblade and the centerboard out of 4 layers Okoume plywood (2x12mm, 2x4mm) to get the right thickness for the gudgeons later on.
... and also the centerboardblade with 24 pd of lead inside
Inside the centerboardblade, which will be 1400 mm long and 500 mm wide we added 24 pd lead sheets which Ant glued in with epoxy to fill all the gaps between.

The weight is important to let the centerboard go down, when it should be lowered. Apart of that it increases the stability of the boat.


The next two pics show the rudder. At the right side you see 4 pieces of plywood glued together. On the left side you see the template for the cheeks - as you can see them they are made of Sapeli. The cheeks will hold the tiller.
The cheeks for the rudderblade
4 pieces of plywood already glued together


The plugholes on the forestem closed with grain plugs

  
In the meanwhile I went on with the fairing of the hull, a lot of really boring sanding and a lot more ahead.


I cut and planed down the too long plugs  and sanded them even to the stemsurface


The time of late evening-work started, as the best conditions for painting in a very frequented workshop are the nighthours, specially if you can't put up a tent - and at the place where I worked it wasn't possible to put one up.

We started the painting process by marking out the waterlines using a laserlevel. Above (at least it's above as long the boat isn't turned) the waterline we will put coppershield-coat on to protect the boat best against algae-growth. We'll need to put at least 3 layers on.

Marking the waterline


Ready for getting her new clothes

Already painted with 3 layers of coppershield

After marking the waterline the boat was wraped into polurethane to keep the rest of the hull clean.


We started Thursday at around 09:00 cleaning the surrounding, hoovering and tacking the boat and finished at 00:30 with the first layer. Until putting on the next layer we had to wait at least 4 hours, so that was put on at 06:00 in the morning and the final one friday evening.


Friday night all 3 layers of Coppershield were on and we were tired.


Sunday 6 September 2015

Week 14 before launch - Fitting the for- and aft-outerstems & fairing the hull


31.08.-06.09.15

Fitting the for- and aft-outerstems & fairing the hull


Forestem fitted and all landings filleted

Saturday 5 September 2015

Week 15 before launch - Fitting the keel


24.08.-30.08.15

Fitting the keel 


This week while I was still in Austria my collegues finished the keel.


Drilling the holes for the keelbolts


The holes for the bronzebolts were drilled and
the keel was glued on.


Darren is filletting the rabettline at the bow


Darren filleted the rabbetline with thickened epoxy and cleaned it up.

Fitted Deadwood at the stern


As mentioned some weeks before, I wanted to leave the sheerblank bright finished. Therefore I has bought special radialcut Sapele-veneered plywood.  But as we didn't get the scarfs as perfect I wanted them to be, I decided to put some Kaya-veneers onto the sheerplanks to make it look better.  On Tuesday and Friday my friends 'cold moulded' the Kaya-veneer onto the existing sheerplank to get her even prettier as she already is. 


The Kaya-veneers on the sheer-plank

I got back to Lyme on Saturday and was happy, that my friends had given me a hand while I was off although it has been a horrible job, as I was informed later.