Sunday, 25 October 2015

Week 07 before launch - Cockpitconstruction and first deckbeams


19.10.-25.1015 

Cockpitconstruction and first deckbeams

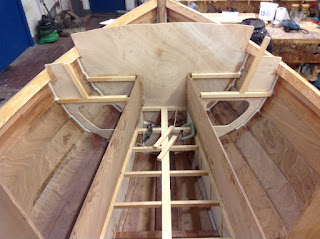
In agreement with Iain Oughtred I increased the  cockpit length to get more space. To do not influence the shape of the hull I left the original bulkhead as far as possible and added one 300 mm aft for buoyancy purposes.

The cockpit sole, the base for the seats as well as for the back of the seats were glued. I lifted the cockpitsole 70 mm over the plans height to get a better draining effect and keep my feet dry. To compensate the additional height I decreased the height of the seats for 35 mm.


Starting the decking was really an exciting moment. The deckbeams which I already had laminated in evening hours during the first 4 months of the course were notched in and glued into the sheerclamp. The small bulkhead marks the aftposition of the berth.


She´s getting shape!
Sitting and discussing with Steven in the evening hours was always a nice kind of ending the daily work. 

Saturday, 17 October 2015

Week 08 before launch - Assembling sheerclamp & centerboardcase


12.10.-18.10.15

Assembling sheerclamp & centerboardcase


Bulkheads fitted and filleted (white lines)


I started the new week glueing the bulkheads onto their positions. The white lines show the fillets with thickened epoxy, which increases the laminationsurface of the bulkheads to the hull and give more strength to the construction. I admit, filleting I don't consider my favorite work, to be honest it's awful to put this sticky stuff in all the edges and corners.


Cutouts for inspection hatches
These are parts of the fore- and aft-buoyancy compartments sealed with epoxy three times. According to an advice of Mark, one of my coursecollegues, I cut the inspection-holes larger as drawn on the plans to get better access. 


 Tuesday was a very exiting day. The centerboardcase had to be fitted in and therefore a hole had to been cut out to fit it in. After numerous times of controlling - is it the right length, is it the right place, ... I started to cut and .....

I did it! The big hole in our boat
 .... the result was perfect.


The centerboardcase ready to be assembled


The centerboardcase on its place


The blue-greenish colour you can see inside the centerboardcase are "Formicasheets", glued on the plywood as a protection. Moving up and down, the centerboard will rub towards the centerboardcase. The "formicasheets" are supposed to protect the wood of the centerboard against this abrasion.


The centerboardcase slotted into the gap exactly and was screwed and glued to the Companionwaybulkhead as well as to the hull and the hog.


The next step was to put the sheerclamps onto the inside of the sheerplanks to stiffen them up and as a base for the deckbeams.

Notches for the sheerclamp


First the notches for the sheerclamps have to be cut into the bulkheads.


Then the sheerclamp had to be produced. Therefore we glued 2 planks together and moulded them by clamping them on the outside of the sheerplank.

Sheerclamps laminated

Quoting Steven: "Rule number 3, you never can have too much clamps"!


Using the hull as a mould for forming the sheerclamps


The sheerclamps already on their place


It took me almost the whole next day to clean, sand and fit the two sheerclamps, so to be able to glue them on the inside of the sheerplank in the evening. But Thursday late in the evening they were glued and clamped.


As Ant was ill already the whole week and working alone your progress is limited I was happy that Darren and Mike helped me on friday.


Anchorbox, small bulkhead before centerboardcase and cockpitseats


Darren sheated the inside od the anchorbox with 200g wooven cloth against abrasion and Mike started to spile and cut the plywoodpeaces for the cockpit, while I spiled and cut the part bulkhead in front of the centerportcase and fitted the logs for the centerboardcase which are necessary to give it more strength.


The glueing of the logs and the bulkhead was done at Sunday. It would have been hard anyway to spend a whole weekend without beening in my loved workshop.

Sunday, 11 October 2015

Week 09 before launch - Assembling the floors & cutting out the first bulkheads


05.10.-11.10.15

Assembling the floors & cutting out the first bulkheads


After the last weeks of painting, sanding, painting, sanding it was really amazing to be back to woodworking.

We made good progress this week, finishing the floors and glueing them in. The floors are to connect both sides of the planking and as a sideeffect to stiffen the hull.

 
The floors nearly finished and ready to be glued


Moreover we even managed to cut some of the bulkheads.


The bulkheads are cut. 


The height of the companionway bulkhead and also of all the other bulkheads will be shaped to the correct measurements when the deckbeams and the cabinroofbeams are going to be fitted.


This berth is long enough but the madress ist terrible!


At the end of the week Eva was able to test the length of the berth although the quality of the "mattress" didn´t really please her.


Sunday, 4 October 2015

Week 10 before launch - Turning of the hull & delivery of the lead keel


28.09.-04.10.2015

Turning the hull & delivery of the lead keel

This week was the great event I was waiting for weeks now. After having postponed the date a couple of times Tuesday the day had finally come and I was really excited, how she would look like in upright position.

Ross standing under the cradle working on the boom 
      On Monday I finished the cradle where she  would sit on for the next two months to be finished and I removed all the moulds except of two to keep her in position.


Lifting the hull
On Tuesday all members of our course and some of the September Course attendees gathered around the hull and lifted her carefully, while Ant removed the last two moulds from the ladderframe.


Here she goes


Then she was carried out of the workshop and turned slowly. Everything went perfect.


Will she fit in?


After turning, the guys carefully placed her onto the cradle. I was a bit worried, that there might be a mistake and she wouldn't fit in, but everything was fine.


Isn´t she pretty?


It was an amazing moment to see her the first time with her beautiful lines. And she looks even bigger, then she did up-side-down.


But a pretty want's to be carressed so me and Ant started immediately to clean her inside (removing the epoxyleavings from glueing the planks).


The next important steps would be to fit the rubrail and to put the floors in.


Pete finished the rubrail last week so we had just to give them the last fitting and fasten them.

I screwed the rubrail onto the hull - where the last plank and sheerplank overlap - by boring holes for the bronzescrews (used to fasten) and the grainplugs to hide them. Bronze is a very soft material so you really have to take care screwing them in. To protect the screwholes from water they have to be sealed. Therefore we added mastics beween the rubrail and the sheerplank.


Well done!


The plugholes we closed with grainplugs and the last finishing was done with some layers of oil.


The leadballastkeel arrived

Another important event was on this week. The leadkeel casted by the IronBrothers arrived.

It weighs 720 pd and should fit into the gap, I left in the keelsection. It's 2130 mm long and squared 125mm x 125 mm. To be more precise I should say:"Now it's 2130 mm long" cause it was delivered 8 mm too long and I had to cut off that.  I calculated a worth of approximately 12 Pounds for the 8mm piece.


To fix the ballastkeel on the backbone I had to drill 5 holes with a diameter of 15 mm with an angle of 7°. Ant "produced" a fidd and told me the direction how to hold the drill.

Drilling the holes for the 15mm bronzekeelbolts

Sunday, 27 September 2015

Week 11 before launch - Working on the yard, boom, mast and rubrail & top-coating the hull


21.09.-27.09.15

Working on the yard, boom, mast and rubrail & top-coating the hull


The 4th primer-coat I drysanded with 320 grit continuing with wetsanding 320 and afterwards 400 grit. That result was o.k. then. At Tuesday we started to put on the first of 4 coats of Epifanes Double-Pack Top Coat.  One person rolls on the colour, the other one puts off what seems to be to much with a ........

As usually we painted late at night, night after night and always a bit later as the drying time was 24 hours and between each layer of top-coat the paint had to be wetsanded with a 600 grit abrasive and carfully cleaned after to get the surface as dust-free as possible. 


While the painting was evening-/night-shift during the day we worked on the yard, boom, mast and the rub rail.

While I finished the yard, Ant & Ross did the scarfs of the mast and glued them. After that Ross started to shape the boom and finished it until the end of the week. 

Ross, shaping the boom


Pete did all the work concerning the rub-rail: scarfing, glueing and fitting it to the sheer-plank. The rubrails will be part of the sheerplanks and will be fitted to their bottom edge, were they meet the white top-coat of the hull.

The two 7.50 m long rubrails 

Pete´s scarfs are nearly unvisible! Well done!


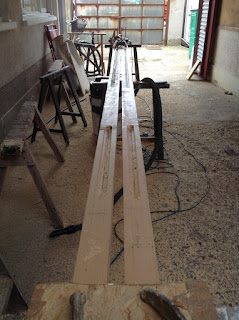
The two masthalfes with one straight and one tapered side

On Thursday I started to shape the two masthalfes. I got the advice to add 10 inches to the mastlength to be able to hoist the sails properly. The mast will have an asymmetric shape. The bowside will be tapered and the aftside straight.


The partly hollowed mastpieces


To reduce the mastweight, I hollowed the  2 masthalfes with a router according the rule 20:60:20 which means 20% of the diameter should be left to get full stability. The first 500 mm I left solid to mount my fittings later.


Sunday, 20 September 2015

Week 12 before launch - Producing the yard & finishing the rudderblade+centerboard & coating the hull with primer


14.09.-20.09.15

Producing the yard & finishing the rudderblade+centerboard & coating the hull with primer

 
This week we intended to produce the yard, finish the rudderblade and centerboard and coat the hull with primer.

The yard will be the gaff boom for the rigg and is shaped out of Alaskian Spruce. To get the squared and out of 4 pieces glued boom round it needs a lot of plane work and a special spar gauge.


Starting shaping the yard


The gauge seen below has a width of  24 parts (mm, 16ths, eights or whatever) which are departed in a ratio of 7:10:7. You use it with two pencils as shown on the picture and it enables you to mark the lines you need to take off the right amount of wood.


Using the spar gauge


 The nearly finished spar with a lot of nice shaves.


While I was working on my yard, Ant continued with the rudderblade and centerboard which he sheathed with two layers of plain weave 200.

The glassed centerboard


Sheathing the ruderblade


fitting the ruddercheeks


The rudderblade is really huge. The total lenght is about 1700 mm


The eveningtime Eva and I spent in romantic primerpainting sessions. The primer is a double pack product and is needed to seal the boat and get a smoothe base for the top coat.


painting the primer


We put on 3 coats of primer. Between the coatings we had to wait at least 8 hours. So our days were timed by the drying times of the paint and evening work was a usual thing during this week.

I´m a bit upset, that I didn´t take more fotos of this and the next week, but the night hours as well as the never ending sanding drained away all my energy.


 As mentioned we first put three layers of primer on, but the result was far from perfect. It was as I would call it a terrible "orange skin" and who want's his new baby to have "orange skin". At first I imagined it would smoothen by wetsanding, the normal procedure following the painting. I Started with wetpaper 240 grit. But as that seemed to have no effect at all I went back to 180 grit. At the end of the day I was more than frustrated:  Still "orange skin" but a lot of spots without any primer any more. 

After having spent about 20 hours sanding with no convincing effect, I was so annoyed, that I decided to sand with dry abrasive 180 grit and to put on a 4th coat of primer on saturday - not before contacting Hempel, the producer, what they would suggest to prevent the uneven surface.

Sunday, 13 September 2015

Week 13 before launch - Production of rudderblade/centerboard & Painting the coppershield


 07.09.-13.09.15

 Production of rudderblade/centerboard & Painting the coppershield


Ant starts crafting the rudderblade

While Ant started crafting the rudderblade and the centerboard I prepared the hull to get ready for painting.

We made the rudderblade and the centerboard out of 4 layers Okoume plywood (2x12mm, 2x4mm) to get the right thickness for the gudgeons later on.
... and also the centerboardblade with 24 pd of lead inside
Inside the centerboardblade, which will be 1400 mm long and 500 mm wide we added 24 pd lead sheets which Ant glued in with epoxy to fill all the gaps between.

The weight is important to let the centerboard go down, when it should be lowered. Apart of that it increases the stability of the boat.


The next two pics show the rudder. At the right side you see 4 pieces of plywood glued together. On the left side you see the template for the cheeks - as you can see them they are made of Sapeli. The cheeks will hold the tiller.
The cheeks for the rudderblade
4 pieces of plywood already glued together


The plugholes on the forestem closed with grain plugs

  
In the meanwhile I went on with the fairing of the hull, a lot of really boring sanding and a lot more ahead.


I cut and planed down the too long plugs  and sanded them even to the stemsurface


The time of late evening-work started, as the best conditions for painting in a very frequented workshop are the nighthours, specially if you can't put up a tent - and at the place where I worked it wasn't possible to put one up.

We started the painting process by marking out the waterlines using a laserlevel. Above (at least it's above as long the boat isn't turned) the waterline we will put coppershield-coat on to protect the boat best against algae-growth. We'll need to put at least 3 layers on.

Marking the waterline


Ready for getting her new clothes

Already painted with 3 layers of coppershield

After marking the waterline the boat was wraped into polurethane to keep the rest of the hull clean.


We started Thursday at around 09:00 cleaning the surrounding, hoovering and tacking the boat and finished at 00:30 with the first layer. Until putting on the next layer we had to wait at least 4 hours, so that was put on at 06:00 in the morning and the final one friday evening.


Friday night all 3 layers of Coppershield were on and we were tired.